
Pier and Beam vs Slab: Australia's Foundation Guide

Updated: Aug 17
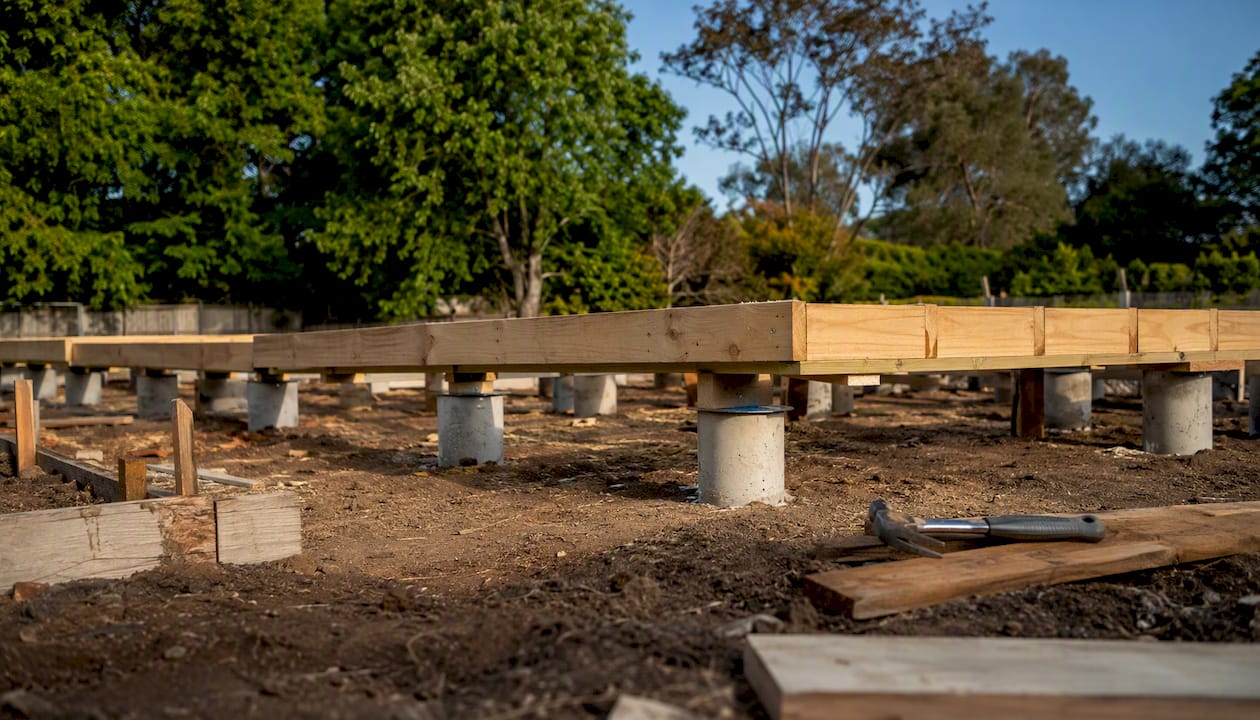
On flat, stable sites classified as A, S, or M under AS 2870, a waffle pod slab is usually the fastest and most cost-effective choice. On reactive clay (H1 and above), steeply sloping blocks, or flood-prone sites, pier-and-beam systems, bored concrete piers, or deep stiffened raft slabs are typically the better call. That’s the short answer. The longer answer depends on your specific site, and the single most important thing you can do right now is commission a geotechnical soil report to get your AS 2870 site classification before you price anything.
Get the soil report first. A geotechnical report and AS 2870 site classification narrows your foundation options from five to two or three, and it’s the document every structural engineer and certifier will ask for anyway.
Cost and time follow site class. On stable ground, a slab saves money and build time. On reactive clay or a sloping block, the cost of site remediation can exceed the slab itself, and piers often come out ahead.
Your immediate next step: Ask your builder or structural engineer for site-class-based foundation options once you have the geotech report in hand. At Yorcon, that’s exactly where we start every Melbourne project.
Key Takeaways
On reactive clay or sloping Melbourne blocks, pier-and-beam systems typically outperform slabs on cost, repairability, and long-term performance, while waffle pod slabs remain the fastest and most economical choice on flat, stable Class A/S/M sites.
Point | Details |
Site class drives the decision | AS 2870 classification (A/S/M vs H1/H2/E) determines which foundation systems are viable before cost or preference matters. |
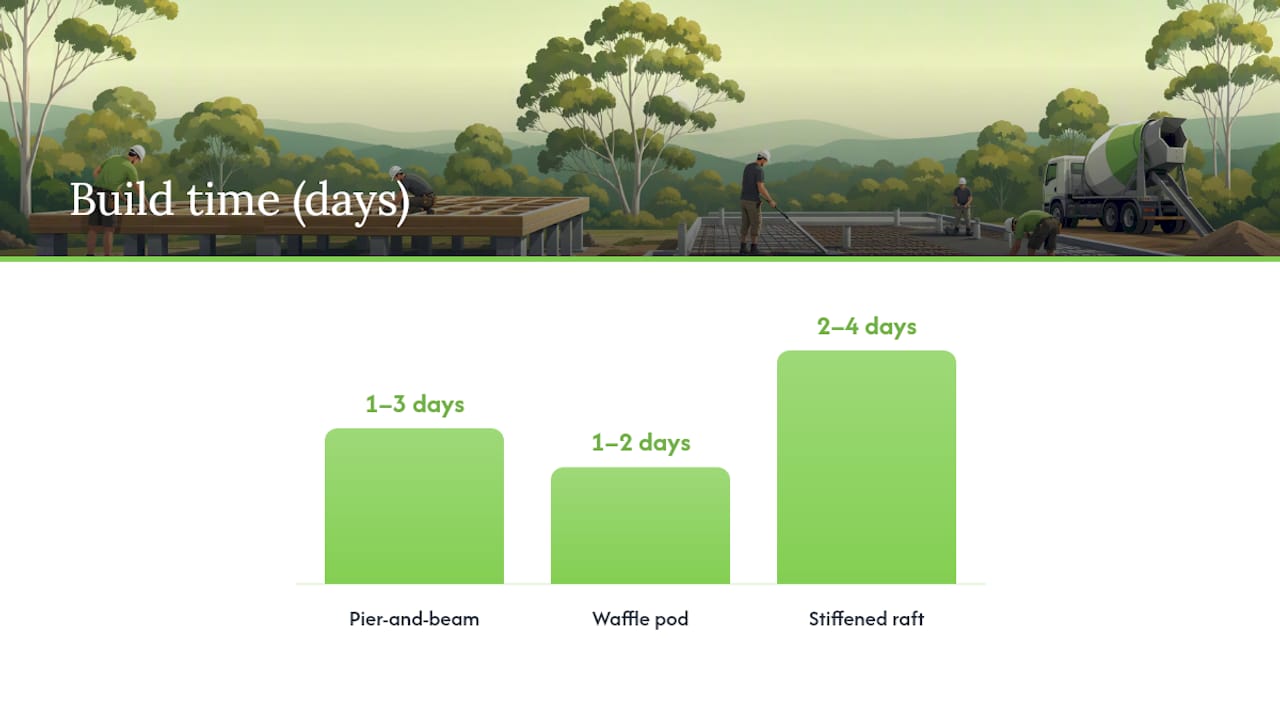
Waffle pod suits stable ground | Waffle pod slabs are fast (1–2 days to pour) and economical on Class A/S/M sites; avoid them on H1+ reactive clay. |
Piers suit reactive and sloping sites | Bored piers (300–450 mm diameter, 1.5–5 m deep) and screw piles handle reactive clay and slopes where slab prep costs escalate. |
Get the geotech report first | A geotechnical soil report is the single best investment before pricing any foundation; it prevents costly quote mismatches. |
Yorcon for Melbourne projects | Yorcon’s site-first, geotech-led approach to design and build in Melbourne reduces foundation surprises and keeps quotes honest. |
Table of Contents
What do “pier-and-beam” and “slab” actually mean in Australia?
What actually happens on site during foundation construction?
When does Australian law require a geotech report and structural engineer?
What Yorcon sees in Melbourne: common site conditions and what they mean
Yorcon handles the foundation complexity so you don’t have to
What do “pier-and-beam” and “slab” actually mean in Australia?
The terminology can get confusing quickly, especially because Australian builders use “stumps,” “piers,” and “bearers and joists” almost interchangeably depending on the era and the region. Here’s what each system actually involves.
Pier-and-beam (raised floor) systems
A pier-and-beam foundation, sometimes called a stump-and-bearer system, lifts the floor structure above the ground on a series of vertical supports. The floor framing, typically bearers and joists, spans between those supports. In older Melbourne homes, those supports were timber stumps. In modern construction, you’ll encounter three main forms:
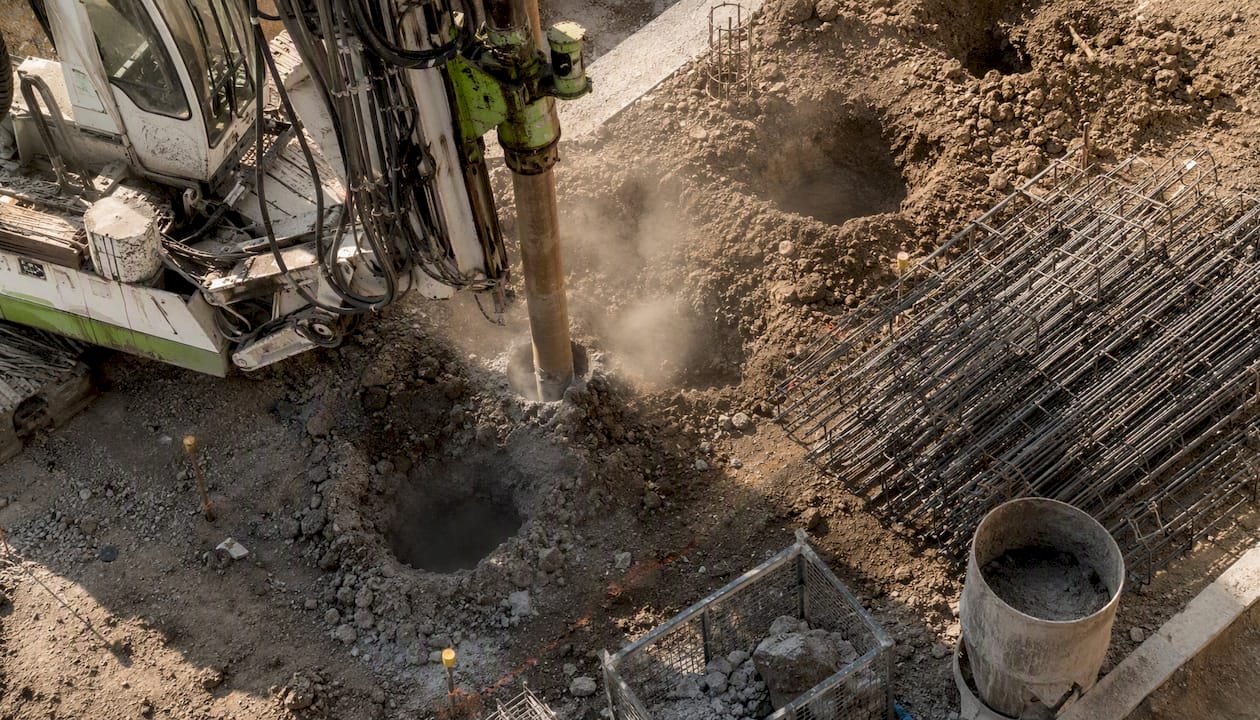
Bored concrete piers are the most common engineered option on reactive sites. A drilling rig bores cylindrical holes into the ground, reinforcement cages are lowered in, and concrete is poured. Typical diameters run 300–450 mm, with depths ranging from 1.5 m to 5 m depending on the AS 2870 site class and the depth of the active moisture-change zone.
Concrete stumps are precast or poured-in-place columns used in lighter residential applications, common in older inner-Melbourne homes and still used in some renovation contexts.
Engineered screw piles and steel piles (sometimes called RapidStump or SurePile-style systems) are driven or screwed into the ground without concrete. These systems are accepted alternatives to bored piers under AS 2870 and the NCC, and they offer a real advantage on sloping or restricted-access sites because they can be installed and built on the same day, with no concrete cure time.
Slab-on-ground systems
A slab-on-ground foundation combines the foundation and the finished floor into a single concrete element. The two types you’ll encounter most often in Australian residential construction are:
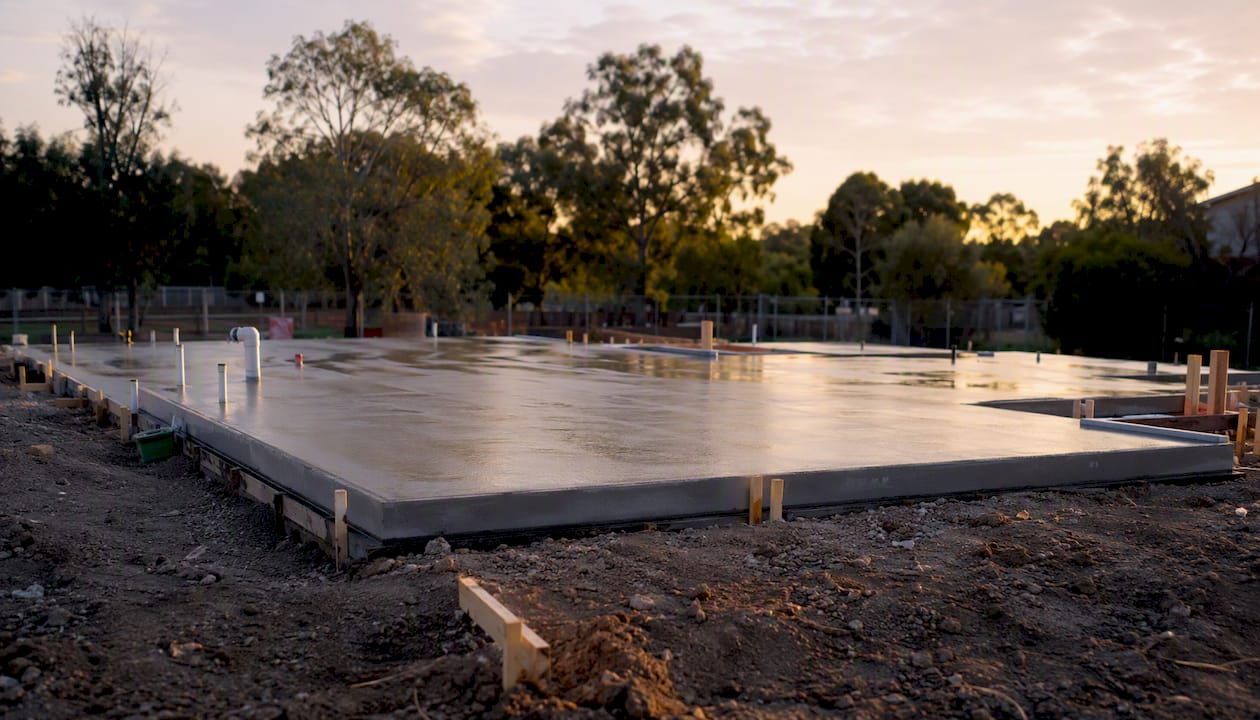
Waffle pod slabs use expanded polystyrene (EPS) pods arranged in a grid under the slab, creating a ribbed underside without deep excavation. They’re fast (a full slab typically pours in one to two days), use less concrete than a raft, and are the dominant choice in project-home construction across Australia. Their shallower rib depths, typically 300–500 mm at the edge beams, make them less suited to highly reactive soils.
Stiffened raft slabs (also called raft slabs) trench internal and perimeter beams deep into the ground, anchoring below the active moisture-change zone. On Class H1 reactive clay, raft beam depths are notably deeper, reflecting the need to anchor below the active moisture-change zone., which means more excavation and more concrete volume, but significantly better performance where the soil swells and shrinks seasonally. Stiffened rafts take two to four days to pour and are the preferred slab option on M, H1, H2, and some E sites.
Statistic callout: A pier-and-beam system for a 200 m² home on a Class H2 site typically costs $30,000–$70,000 depending on pier depth and number, according to Concretemetric’s Australian residential foundation guide.
How do you decide? A practical site-by-site checklist
The decision between pier and beam vs slab is rarely a matter of personal preference. Your site conditions, governed by AS 2870 and the National Construction Code (NCC), do most of the deciding for you. Work through these steps in order.
Consider heritage constraints: Older Melbourne homes with existing timber subfloors often retain pier-and-beam systems during renovation to preserve floor levels and avoid disturbing heritage fabric. Raised floor systems simplify integration with existing timber subfloors and make service routing far easier.
Questions to ask your geotechnical engineer: What is the active zone depth? What pier depth and diameter do you recommend for this site class? Is the soil suitable for screw piles or does it require bored piers? Are there any fill layers or contamination that affect footing design?
Questions to ask your structural engineer: What beam depths are required for a stiffened raft on this site? What uplift forces should the pier design account for on swelling clays? What reinforcement specification do you recommend?
Pro Tip: When comparing quotes, always verify what’s included in the foundation line item. Site preparation, pier count, ground beams, termite barriers, and concrete pump hire are frequently excluded from the headline number, and each one can add thousands to the final cost.
Pier-and-beam vs slab: a side-by-side comparison
Dimension | Pier-and-beam / raised piers | Waffle pod / stiffened raft slab |
AS 2870 site suitability | Preferred on H1, H2, E; suits sloping blocks and flood-prone sites | Waffle pod suits A/S/M; stiffened raft suits M/H1/H2 with engineer design |
Typical cost range (200 m² home) | $30,000–$70,000 on H2 sites; lower on accessible flat sites with screw piles | — |
Build time | Piers: 1–3 days install; screw piles: same-day build possible | Waffle pod: 1–2 days pour; stiffened raft: 2–4 days pour, plus cure time |
Maintenance and repairability | Excellent subfloor access for plumbing, electrical, and re-leveling | No subfloor access; repairs require cutting concrete or working from above |
Performance risks | Pier settlement on poorly designed reactive sites; timber rot/termite in older stumps | Heave and cracking on reactive clay if under-specified; costly to repair |
Thermal and floor-level effects | Floor sits above ground; requires insulation under floor; cooler in summer | Thermal mass benefit in temperate climates; floor sits at ground level |
Resale and insurance | Buyers familiar with stumps in older Melbourne homes; heritage appeal | Preferred by many buyers for perceived simplicity; standard for new builds |
Pier-and-beam: main advantages and watch-outs
The biggest practical advantage of a raised floor is access. Plumbers and electricians can work under the house without cutting concrete, which makes renovations and repairs significantly cheaper over time. Sloping blocks and modular builds also benefit from piers because they reduce earthworks, and on heritage Melbourne properties, retaining the existing pier-and-beam structure often preserves floor levels and avoids disturbing the heritage fabric.
The watch-outs: older timber stumps rot and attract termites. Steel piers can corrode if the protective coating is damaged. And if the pier design under-estimates the active zone depth on reactive clay, differential settlement can still occur, causing the same cracking and door-sticking problems as a poorly specified slab.
Slab: main advantages and watch-outs
A slab is the floor and the foundation in one, which simplifies construction on flat, stable ground and delivers thermal mass benefits in Melbourne’s temperate climate. Waffle pod slabs are fast and economical. Stiffened rafts handle moderate to high reactivity well when properly engineered.
The watch-out is repairability. A cracked or heaved slab is expensive to fix. Plumbing under a slab requires concrete cutting, and if the slab moves significantly on reactive clay, the repair bill can run into tens of thousands of dollars. On Class H2 or E sites, a slab that isn’t engineered to the full AS 2870 specification is a long-term liability.
Environmental note: Waffle pod slabs use less concrete than stiffened rafts, reducing embodied carbon. Screw pile systems use steel rather than concrete, which carries a different carbon profile but eliminates the water and aggregate volumes associated with poured concrete. For sustainability-conscious builds, the choice between systems is worth discussing with your engineer alongside the structural requirements.
What actually happens on site during foundation construction?
Understanding the sequence helps you spot delays, ask the right questions at inspections, and plan for the weeks when nothing visible seems to be happening.
Long-term maintenance and what goes wrong
Both systems have failure modes. The difference is how expensive and disruptive those failures are to fix.
Common slab problems
Differential settlement is the most serious slab issue, and it’s most common on reactive clay sites where the slab was under-specified for the soil class. The signs are cracking at door and window corners, floors that are no longer level, and gaps opening between the slab and brickwork. Repairs range from chemical injection (polyurethane foam lifting) for minor movement to full underpinning or slab replacement for severe cases.
Plumbing penetrations through slabs are a chronic maintenance issue. Any pipe that passes through the slab creates a potential leak point, and accessing it means cutting concrete. On older homes, this can cost several thousand dollars for a single repair.
Statistic callout: According to Concretemetric’s Australian foundation guide, bored pier systems on Class H2 sites typically run $30,000–$70,000 for a 200 m² home, but slab repairs on a poorly specified reactive-clay site can approach or exceed that figure over a 20-year period.
Common pier-and-beam problems
Older timber stumps rot, particularly in Melbourne’s wetter western and inner-northern suburbs. Termite damage to stumps and bearers is a real risk in any raised floor system that lacks a current termite management program. The good news is that both problems are detectable early with a subfloor inspection and repairable without major disruption.
Steel piers can corrode if the protective coating is breached, particularly in areas with aggressive soils or high moisture. Adjustable screw pile systems allow re-levelling without excavation, which is a genuine long-term advantage over concrete stumps.
Maintenance checklist for homeowners:
Inspect subfloor space every two years for moisture, timber decay, and termite activity.
Check pier heads and bearer connections for movement or corrosion annually.
Monitor doors and windows for sticking, which is an early indicator of foundation movement.
After a dry summer or wet winter, walk the perimeter and check for gaps between the slab edge or skirting and the ground.
If cracks reopen seasonally, commission a structural engineer’s inspection rather than patching them.
How to tell if an existing house is pier-and-beam or slab
If you’re buying an older Melbourne home or planning a renovation, knowing what’s under the floor changes everything about your budget and your options.
Walk the perimeter. A raised floor system will show a gap between the floor level and the ground, often with ventilation grilles or timber skirting covering the subfloor space. The house will sit visibly above the yard level.
Look for stumps or piers. On older homes, you may see timber or concrete stumps visible under the house from the side. On newer pier systems, you might see steel pile caps at the perimeter.
Check for a crawlspace. If you can access a subfloor space (even a small one), it’s a raised floor system. Slabs have no crawlspace.
Tap the floor. A hollow sound suggests a suspended timber floor over a subfloor. A solid, dense sound suggests a concrete slab.
Check the building permit records. Your local council holds permit records that often specify the foundation type. For homes built after 1990, the original engineering certificate may still be on file.
Commission a pre-purchase inspection. A licensed building inspector will identify the foundation type and flag any movement, rot, or structural concerns.
Red flags that need specialist input:
Doors and windows that stick or have been planed down repeatedly.
Cracks at 45 degrees from window and door corners that have been patched more than once.
Floors that feel springy or uneven underfoot.
Water pooling against the slab edge or around pier bases after rain.
Visible timber decay, white ant leads, or corroded steel at pier heads.
A subfloor that smells damp or shows efflorescence on masonry piers.
Any of these signs warrants a geotechnical or structural inspection before you commit to a purchase or a renovation scope.
When does Australian law require a geotech report and structural engineer?
Not every foundation needs a custom engineering design. AS 2870 provides deemed-to-satisfy solutions for standard site classes, which means a builder can follow the standard’s tables without a bespoke engineering brief. But there are clear thresholds where that approach stops being sufficient.
A structural engineer’s design is typically required when:
The site is classified H1, H2, or E under AS 2870, where standard deemed-to-satisfy details are either unavailable or inadequate.
The block has a significant slope, unstable fill, or known contamination.
The site is in a flood overlay or close to a waterway.
Retaining structures are within the influence zone of the proposed footings.
The building loads are outside the standard residential range (e.g., heavy masonry, multi-storey additions).
The local council’s planning permit or building permit conditions require engineering certification.
Regulatory callout: AS 2870-2011 sets the deemed-to-satisfy designs and classification method for residential slabs and footings. For site classes beyond M, or where site conditions fall outside the standard’s scope, a geotechnical report and structural engineer’s design are required under the NCC.
What a geotechnical report should include:
Soil profile and description to the depth of the active zone.
Atterberg limits (liquid limit, plasticity index) for reactive clay identification.
AS 2870 site classification.
Active zone depth and recommended pier depth or beam depth.
Any fill layers, contamination, or groundwater issues.
Recommendations for termite management and drainage.
Regulatory checklist for your certifier or builder:
AS 2870 site classification confirmed in writing.
Geotechnical report prepared by a registered geotechnical engineer.
Structural engineer’s footing design for H1+ sites.
NCC compliance confirmed for termite management and drainage.
Local council permit conditions reviewed for any additional foundation requirements.
What Yorcon sees in Melbourne: common site conditions and what they mean
Melbourne’s geology is genuinely varied, and the foundation decision looks different depending on which part of the city you’re building in.
Inner-urban flat blocks (Fitzroy, Richmond, South Yarra): These sites are often Class M, with relatively stable ground and minimal slope. A stiffened raft slab is the typical recommendation here, particularly for new builds and rear extensions. The main complication is usually access: narrow laneways, heritage overlays, and existing trees can restrict equipment. Screw pile systems have become increasingly practical in these situations.
Western suburbs reactive clay (Sunshine, Werribee, Melton): This is classic H1 and H2 territory. The black cracking clay in Melbourne’s west is among the most reactive in Australia, and a waffle pod slab on these sites is a risk that no experienced builder should take. Stiffened raft slabs with deep beams, or bored pier systems, are the standard approach. The geotech report is not optional here.
Hilly outer suburbs and Dandenong Ranges: Sloping blocks in the outer east and the Ranges almost always favour pier systems. The alternative, cutting and filling to create a level platform for a slab, involves significant earthworks and retaining structures that can cost more than the foundation itself. Piers follow the slope, reduce earthworks, and often deliver a better result faster.
On heritage renovation projects, which make up a meaningful part of Yorcon’s work in Melbourne’s inner ring, pier-and-beam systems often make the most sense even when the site class would permit a slab. Retaining the existing subfloor structure preserves floor levels, avoids disturbing heritage fabric, and makes the heritage renovation far less disruptive. The cost of heritage home renovations in Melbourne reflects this complexity, and foundation decisions are a significant part of that picture.
What to prepare for your Yorcon consultation:
Certificate of title and a recent site survey if available.
Any existing geotechnical or soil reports for the site.
Known drainage or flood information (council flood overlays, historical water ingress).
Your desired floor layout and any heritage or planning constraints.
A realistic budget range, including contingency for site-specific conditions.
The foundation advice that actually protects you
There’s a version of the pier and beam vs slab conversation that happens in showrooms and on builder websites, and it’s mostly about which system sounds better. The version that actually protects homeowners is the one that starts with the soil.
What most articles won’t tell you is that the foundation type is rarely the expensive decision. The expensive decision is what you do with the site before the foundation goes in. Reactive clay stabilization, cut-and-fill on a sloping block, rock removal, and dewatering are the line items that blow budgets. A pier system on a difficult site often costs less than a slab on the same site, not because piers are cheap, but because the slab would require $20,000 worth of site prep that piers simply don’t need.
The other thing worth saying plainly: a stiffened raft slab on a Class H1 site, properly engineered, is an excellent foundation. So is a bored pier system on the same site. The question isn’t which system is categorically better. It’s which system your engineer specifies for your site, and whether your builder has priced it honestly.
At Yorcon, we’ve seen the consequences of both under-specified slabs and poorly designed pier systems in Melbourne’s reactive clay suburbs. The pattern is almost always the same: the geotech report was skipped, or the quote was based on a standard slab without checking the site class. The repair costs that follow are avoidable.
Yorcon handles the foundation complexity so you don’t have to
Foundation decisions are technical, site-specific, and consequential. Getting them wrong is expensive. Getting them right early, with the right engineering and the right builder, is one of the best investments you can make in a new build or renovation.
Yorcon manages the full process: site assessment, geotechnical coordination, structural engineering liaison, permit applications, and construction. Whether you’re planning a home extension in Melbourne, a major renovation, or a new architectural build, we start with the soil report and work forward from there. No guesswork, no provisional sums that balloon after the contract is signed.
For heritage homes in Melbourne’s inner suburbs, where the foundation decision intersects with planning overlays and existing subfloor structures, that integrated approach makes a real difference. We’ve navigated reactive clay in the west, sloping blocks in the outer east, and tight inner-city sites where access alone required creative engineering solutions.
To get a fast initial quote, send us your certificate of title, any existing soil reports, and a rough floor plan or brief. If you don’t have a soil report yet, that’s fine — we can help you commission one as part of the early project scoping. Talk to the Yorcon team and let’s start with the ground beneath your home.
Useful sources and further reading
These are the primary references used in this article. Bring them to your builder, geotechnical engineer, or certifier conversations.
Residential Slabs and Footings Construction Requirements | HIA
Concrete footings — A practical guide for Australia | Easy Footings
Types of footings — structural design notes | MFS Engineering
Concrete Slabs vs Piers: What’s the Best Foundation? | Manor Homes
Slab on Ground vs. Raised Floor Systems for Australian Kit Homes | Imagine Kit Homes
Recommended


