
How to communicate with your builder effectively

The simplest way to avoid confusion on any build is to agree a written communication plan before work starts: one named contact, clear channels, a regular update cadence, and documented approvals for every change. Good communication reduces costly mistakes, delays, and stress across the entire project. Get these basics locked in on day one and you’ll sidestep the vast majority of disputes before they have a chance to form.
Your day-one checklist:
Nominate a single point of contact on both sides (you and your builder)
Agree preferred channels: email for records, SMS for urgent site issues, phone for quick decisions
Set response-time expectations (a simple SLA: 24 hours for email, 4 hours for SMS during business hours)
Schedule a weekly progress update in writing
Require written variation approvals before any change proceeds
Confirm milestone sign-offs at each major stage
Check your builder’s licence and home warranty insurance before signing anything
That last point is your baseline trust signal. Verify your builder’s licence through your state regulator and confirm home warranty insurance is in place before you put pen to paper.
Key takeaways
Clear, documented communication with your builder, starting before work begins, is the single most effective way to protect your budget, timeline, and working relationship.
Point | Details |
Written communication plan first | Agree channels, contacts, and response times before work starts and email the plan to your builder for written confirmation. |
Variations always in writing | Never accept a verbal change; require a signed variation showing cost and time impact before any work proceeds. |
Weekly updates reduce ad-hoc calls | A short Friday summary covering what happened, what’s next, and open issues keeps both sides aligned without constant check-ins. |
Raise issues early with evidence | A dated email with photos and a 14-day deadline is far more effective than a phone call, and far cheaper than a tribunal. |
Yorcon’s managed approach | Yorcon provides a single project manager, weekly written updates, and documented sign-offs on every Melbourne build. |
Table of Contents
How do you communicate with your builder in a way that actually works?
The guiding principle is straightforward: be consistent, factual, and civil. Tone matters as much as content. A message that reads as accusatory will put your builder on the defensive; one that states facts and asks a clear question gets answered faster and more honestly.
Core principles to keep front of mind:
Clarity: say exactly what you mean. Vague requests produce vague results.
Timeliness: raise concerns as soon as they appear, not weeks later when the work is set.
Single source of truth: the signed contract and written variations are the reference documents, not memory.
Confirm in writing: after every conversation, send a short email summarising what was agreed.
Escalation paths: know in advance who you speak to if the site manager can’t resolve an issue.
A client who emails a short confirmation after every conversation creates a paper trail that prevents “he said / she said” disputes later. It takes two minutes and it’s one of the most protective habits you can build.
Pro Tip: When an email thread starts to feel tense or circular, pick up the phone or arrange a brief face-to-face meeting. Tone is almost impossible to read correctly in text, and a ten-minute conversation can reset a relationship that weeks of emails have strained. Being reasonably assertive while maintaining professional respect is the balance worth aiming for.
Start with a clear contract and scope of works
The contract is your project’s source of truth. Before a single sod is turned, you should be able to open that document and find answers to every major question about what’s being built, what it costs, and what happens when something goes wrong. Ambiguity in the contract almost always becomes a dispute on site.
Check that your contract includes:
A detailed scope of works (what is and isn’t included, materials and finishes specified)
A progress payment schedule tied to construction stages
A retention sum arrangement and the conditions for its release
A written variation process (how changes are requested, priced, and approved)
A defects liability period and warranty terms
Home warranty insurance details and the insurer’s name
A clear statement of who makes technical decisions (builder, architect, certifier)
Jobs over $20,000 require home warranty insurance in most Australian states, and retention sums and defects clauses are standard protections you should confirm are present. If your contract is missing any of these, ask for them in writing before you sign.
Before you sign: verify your builder’s licence through your state regulator and confirm home warranty insurance is current. These two checks take less than fifteen minutes and protect you against the most serious risks a build can carry.
Understanding what happens before building starts — permits, approvals, and early communication expectations — also helps you ask the right questions at contract stage.
How should you agree channels and response times with your builder?
Pick one main contact and match your communication channel to the purpose of the message. This single decision removes more confusion than almost anything else you can do. Establishing communication protocols before construction begins means everyone knows where to look and how quickly to expect a reply.
Recommended channel uses:
Email: all formal records, variation approvals, complaints, and meeting summaries
SMS: urgent site issues that need a same-day response (a delivery problem, a safety concern)
Phone: quick decisions where a back-and-forth email thread would waste time
Site meetings: workmanship reviews, milestone sign-offs, and anything that benefits from being seen in person
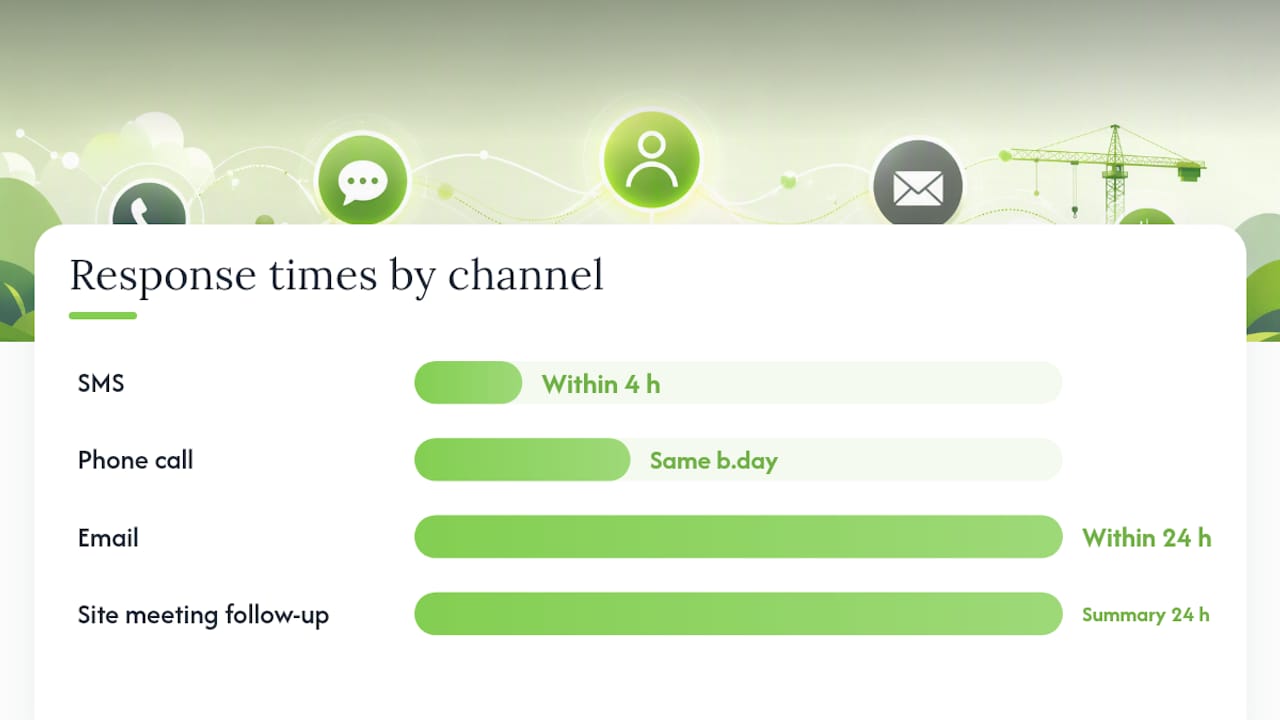
Sample response-time SLA:
Channel | Expected response time |
Within 24 hours on business days | |
SMS | Within 4 hours during business hours |
Phone call | Same business day |
Site meeting follow-up | Summary email within 24 hours |
Understanding the role of a project manager on your build also clarifies who owns each channel and who to contact when your primary contact is unavailable.
Pro Tip: Set a clear boundary for non-urgent messages: agree with your builder that anything not site-critical can wait until the next business day. After site meetings, send a brief summary email within 24 hours confirming what was discussed and what the next steps are. This habit alone prevents most “I thought you said…” moments.
How do you set a communication schedule and milestone sign-offs?
Agree a regular update cadence before work starts, then tie formal sign-offs to each major construction stage. A standardised weekly summary covering what happened, what’s next, and any open issues reduces anxiety and cuts the number of ad-hoc calls you’ll need to make.
A simple milestone timeline:
Mobilisation: site set-up confirmed, access arrangements agreed, first weekly update sent
Lock-up: external walls, roof, and windows complete; sign-off on structural work before internal trades begin
Services rough-in: electrical, plumbing, and HVAC in place; sign-off before lining
Practical completion: all contracted work finished; defects inspection completed
Handover and defects period: keys handed over, defects list issued, retention release schedule confirmed
Each milestone sign-off should record:
Scope items completed at that stage
Any outstanding items and their agreed completion dates
Photos of completed work
Confirmation of the next stage start date
Milestone sign-offs also create natural moments to acknowledge progress — lock-up is worth a brief acknowledgement. Celebrating progress keeps the working relationship positive and reduces adversarial tension.
How do you document variations and approvals properly?
Never accept a verbal change order. Every variation, no matter how small, should be in writing and show the cost and time impact before any work proceeds. This is the single habit that most reliably keeps budgets and timelines intact.
A variation form should capture:
A clear description of the change (what is being added, removed, or substituted)
The cost impact (fixed price or estimate, with GST noted separately)
The time impact (days added or removed from the programme)
The name of the person who approved it and the date
A reference to the relevant contract clause
Confirmation that the original scope item it replaces (if any) is removed from the contract
Beyond the form itself, photograph materials on delivery and record their condition before installation. Keep receipts for any client-supplied materials tied to a variation. These records become critical if a dispute arises over what was supplied and when.
How do you run a productive and safe site visit?
A site visit with no agenda tends to become an unstructured walkabout that leaves everyone uncertain about what was actually agreed. Plan each visit around a short checklist and you’ll leave with clear answers rather than more questions.
Site visit checklist:
Who attends: site manager or foreman as a minimum; architect or contract administrator when technical decisions are on the agenda
Safety first: wear appropriate PPE (hard hat, hi-vis, steel-capped boots); follow the site induction rules and never enter restricted areas without the site manager
What to inspect: workmanship quality, installed items against the specification, dimensions and setouts, any defects or unfinished work
Record keeping: photograph everything you discuss, note the date and time on each photo, and send a follow-up email summarising what you saw and any agreed actions
One thing worth keeping in mind: avoid directing trades directly on site. All instructions should go through the site manager. Bypassing that chain of command slows work, creates confusion about who authorised what, and can affect your contractual position if something goes wrong.
Understanding what to expect after signing a building contract helps you arrive at site visits knowing which decisions are yours to make and which belong to the builder.
What questions should you ask your builder at each stage?
The questions you ask at quoting stage reveal as much about a builder’s communication style as their answers do. How a builder communicates during quoting is predictive of how they’ll communicate on site — pay attention to response times and clarity before you sign.
High-impact questions to ask right now:
What exactly is included in the scope, and what’s excluded?
Who is my single point of contact throughout the build?
How are variations requested, priced, and approved?
What is your standard response time for emails and site queries?
Stage-by-stage prompts:
Pre-contract (must-ask):
Is home warranty insurance included, and who is the insurer?
What does the defects liability period cover and for how long?
How is the retention sum held and released?
Mobilisation (must-ask):
What are the site access hours and safety requirements for my visits?
When will I receive my first weekly update?
Mid-build (good-to-ask):
Are we tracking against the programme? If not, what’s the revised completion date?
Are there any variations pending that I haven’t approved yet?
Pre-handover (must-ask):
What defects have been identified and when will they be rectified?
When will the certificate of practical completion be issued?
For a deeper set of prompts, the questions to ask your home builder guide covers the full selection and contracting process in detail.
How do you raise issues and escalate a building dispute?
Raise concerns early, in writing, with evidence and a clear requested remedy. A problem flagged at framing stage costs a fraction of what it costs to fix after lining is installed. Written complaints should include a clear description, reference to the relevant contract clause, photos, the remedy you’re seeking, and a reasonable deadline — 14 days is the commonly recommended standard.
Sample complaint email structure:
Subject: Formal concern — [brief description] — [project address] Dear [Builder’s name], I am writing to raise a formal concern regarding [describe the issue clearly and factually]. This relates to clause [X] of our contract dated [date]. I have attached [photos / inspection report / relevant correspondence] as supporting evidence. My requested remedy is [state exactly what you want done]. I ask that you respond in writing within 14 days of this email. Please confirm receipt of this message. Regards, [Your name]
Escalation path if the issue isn’t resolved:
Site manager: raise the issue verbally and follow up in writing within 24 hours
Project manager or builder principal: escalate with your written evidence if the site manager doesn’t respond within the agreed timeframe
Independent building inspector or certifier: commission an independent inspection report to document the defect formally
State building authority or consumer affairs body: lodge a formal complaint with Consumer Affairs Victoria or your state equivalent, supported by your written record
Building tribunal: VCAT in Victoria, or the relevant tribunal in your state, as a last resort when direct negotiation has failed
Build a pre-agreed escalation path into your communication plan from the start so that an unresolved issue automatically moves to the next level without becoming a personal confrontation.
What records should you keep, and how do you manage handover?
A good handover is a documented one. Keep every contract document, signed variation, photo, invoice, and inspection report in a single folder — physical or digital — from day one. You’ll need these records for the defects period, for insurance claims, and occasionally for disputes that surface months after practical completion.
Handover checklist:
Certificate of practical completion (signed and dated)
Completed defects list with agreed rectification dates
Retention release schedule and conditions
All warranties (structural, waterproofing, appliances, finishes)
Home warranty insurance certificate and policy details
As-built drawings and any council-approved plans
Maintenance manuals for installed systems (HVAC, hot water, electrical)
Defects period reminder: most Australian residential contracts include a defects liability period of 13 weeks to 12 months after practical completion. During this time, notify your builder of any defects in writing as soon as you find them. Verbal reports are easy to dispute; a dated email with a photo is not.
Confirm that your builder’s licence and home warranty insurance remain valid at handover — not just at contract signing. The contract and home warranty insurance are your main protections as a homeowner, and both should be current through the defects period.
A practical communication plan you can copy and use today
Copy this template, fill in the blanks, and email it to your builder before work starts. Ask them to confirm it in writing. That confirmation becomes your first piece of documented mutual understanding.
Communication plan template:
Main contact (builder side): [Name, mobile, email]
Main contact (client side): [Your name, mobile, email]
Backup contact (builder side): [Name, mobile, email]
Channel matrix:
Email: formal records, variations, complaints, meeting summaries
SMS: urgent site issues (same-day response required)
Phone: quick decisions, time-sensitive queries
Site meetings: workmanship reviews, milestone sign-offs
Response-time SLA:
Email: 24 hours on business days
SMS: 4 hours during business hours
Phone: same business day
Site meeting summary: email within 24 hours of the meeting
Weekly update template (builder sends every Friday):
What happened this week: [summary of work completed]
What’s planned next week: [upcoming tasks]
Open issues: [any unresolved items, with owner and due date]
Photos: [minimum two progress photos attached]
Variation approval fields:
Description of change:
Cost impact (inc. GST):
Time impact (days):
Approved by (client):
Approved by (builder):
Date:
Contract clause reference:
Milestone checklist: mobilisation sign-off / lock-up sign-off / services sign-off / practical completion sign-off / handover and defects sign-off
Save this document in your project folder and email it to your builder at the kick-off meeting. Kicking off with a same-page meeting that walks through scope, channels, and escalation points sets the tone for the entire build. For a broader view of the custom home build process step by step, that context helps you anticipate when each communication milestone will fall.
How Yorcon keeps clients informed on Melbourne builds
At Yorcon, we’ve managed communication on Melbourne residential projects for nearly 20 years, and the pattern is consistent: the builds that run most smoothly are the ones where expectations are documented before the first trade arrives on site.
Our standard approach on every project includes:
A dedicated project manager as your single point of contact from design through to handover
Weekly summary emails covering progress, upcoming decisions, and any open items
Written variation approvals before any change to scope or cost is actioned
On-site sign-offs at each major milestone, with photos and a written record
Clear escalation paths so that any concern reaches the right person without delay
We think of the communication plan as part of the build itself, not an afterthought. When clients know who to call, what to expect each week, and how changes will be handled, the working relationship stays constructive even when unexpected issues arise. That’s the environment where good craftsmanship happens.
Yorcon makes clear communication part of every project
Clear, consistent communication isn’t a bonus feature on a Yorcon project; it’s built into how we manage every build. Where other arrangements leave homeowners chasing updates or discovering variation costs after the fact, Yorcon’s integrated project management means you have one contact, scheduled weekly updates, and documented approvals at every step.
Whether you’re planning a home extension in Melbourne, a major renovation, or an architectural new build, our team handles the full process from design and permits through to handover, with communication structured so nothing falls through the cracks. Nearly 20 years of Melbourne residential builds means we’ve seen what goes wrong when communication is left to chance, and we’ve built our process around preventing it.
Ready to start your project with a builder who keeps you informed at every stage? Get in touch with Yorcon to discuss your build.
Useful Australian resources to check
Victorian Building Authority: guidance on communicating with your builder, including what to expect at each stage. Check this before your first site meeting.
Consumer Affairs Victoria: plain-language checklists for during construction and guidance on raising disputes. Use this when informal resolution has stalled.
NSW Fair Trading licence verification: verify a builder’s licence before signing a contract. Each state has an equivalent tool.
TradieVerify building dispute guide: step-by-step guidance on handling a dispute, including what documentation each stage requires.
ContractsSpecialist (NSW): practical communication tips covering SLAs, channels, and written records for residential projects.
Each state also has its own building authority and consumer affairs body. Contact the licence verification tool before signing, and your state building authority or consumer affairs office once informal resolution has been attempted and hasn’t resolved the issue.
Sources
Recommended


